This section allows you to view all posts made by this member. Note that you can only see posts made in areas you currently have access to.
Messages - CMD.exe
Pages: 1 ... 202122 2324 ... 28
631
« on: June 11, 2019, 07:16:27 PM »
we got a couple new pokemon revealed in this E3 demo
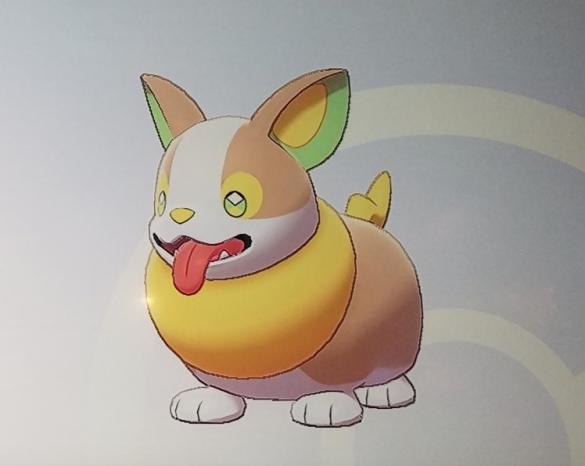
Yamper, an Electric-type corgi (whose mere existence confirms a big leak)
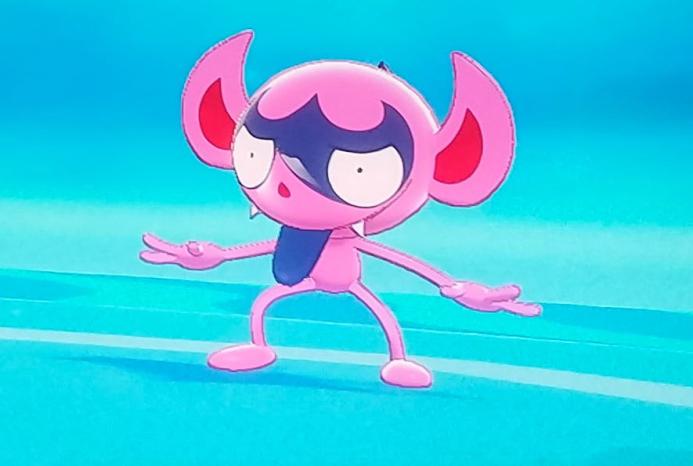
Impidimp, the first Fairy/Dark-type
I love the Corgi. That second thing was an error in Blender that some intern tried to pass as a Pokemon design so he wouldn't get fired
632
« on: June 11, 2019, 03:03:10 PM »
GAMES
MOVIES
TV
VIDEO
WIKIS
ChaosMetalDragon
7,260
PAGES
ADD
CHARACTERS
MECHANIC
SERIES
COMMUNITY
EXPLORE
DISCUSS
in:
Characters, Universal Century characters, Male, Deceased
Amuro Ray
English
EDIT
SHARE
Please note that this is the Gundam Wiki's article on the protagonist of Mobile Suit Gundam; if you are looking for the article on the protagonist of Mobile Suit Gundam: The Origin then you should head to Amuro Ray (Origin).
Amuro Ray Browse icon
15, U.C. 0079 23, U.C. 0087 29, U.C. 0093
15, U.C. 0079
Amuro Ray
Real World
Television
MSG: Episode #1 - #43
MSZG: Episode #6 - #38
OVA
Evolve
Movie
Mobile Suit Gundam I
Mobile Suit Gundam II: Soldiers of Sorrow
Mobile Suit Gundam III: Encounters in Space
Mobile Suit Zeta Gundam: A New Translation - Heir to the Stars
Mobile Suit Zeta Gundam: A New Translation II - Lovers
Mobile Suit Zeta Gundam: A New Translation III - Love Is the Pulse of the Stars
Gundam Neo Experience 0087: Green Divers
Mobile Suit Gundam: Char's Counterattack
Manga
MSG 0079
MSG-CC (M)
Gundam 0079 - Nightmare of Solomon
MSG-CCA BC
MOON
MSZG Define
MSG-Z:Lovers
Novel
Mobile Suit Gundam: Secret Rendezvous
Mobile Suit Zeta Gundam (Novel)
Mobile Suit Gundam ZZ (Novel)
Mobile Suit Gundam: Char's Counterattack - High Streamer
Mobile Suit Gundam: Char's Counterattack - Beltorchika's Children
Game
Mobile Suit Gundam: Journey to Jaburo
Mobile Suit Gundam: Federation vs Zeon
Dynasty Warriors Gundam
Dynasty Warriors Gundam 2
Dynasty Warriors Gundam 3
Dynasty Warriors Gundam Reborn
Japanese Voices
Tōru Furuya Icon - Search
English Voices
Brad Swaile (MSG / MSG-CCA)
Michael Lindsay (MSG I / MSG II SoS / MSG III EiS)
Matthew Erickson (MSZG)
Profile
Aliases
The White Devil
White Shooting Star
White Unicorn
Species
Human
Genetic Type
Newtype
Height
168 cm (MSG)
180 cm (MSG-CCA)
Hair Color
Brown
Eye Color
Brown
Age
15-16 (MSG)
23 (MSZG)
29 (MSG-CCA)
Birth Date
November 4,0063 (U.C.)
Died
March 12, 0093 (U.C.)
Status
Killed in Action
Gender
Male
Family
Tem Ray (Father)
Kamaria Ray (Mother)
Unborn Child with Sayla Mass (novel)
Unborn Child with Beltorchika Irma (MSG-CCA: BC)
Love Interests
Matilda Ajan (MSG)
Lalah Sun (MSG / MSG III EiS)
Fraw Kobayashi (MSG / MSZG)
Sayla Mass (MSG)
Beltorchika Irma (MSZG)
Chan Agi (MSG-CCA)
Nationality
Earth Federation (Side 7)
Affiliation
Earth Federation Forces Icon - Search
Anti Earth Union Group Icon - Search
Karaba Icon - Search
Londo Bell Icon - Search
Occupation
Mobile Suit Pilot
Rank
Chief Petty Officer (MSG / MSG I)
Ensign (MSG / MSG II SoS / MSG III EiS)
Lieutenant (MSZG / MSG-CCA)
Captain (AEUG) (MSZG)
Mecha Piloted
Base Jabber
CB-9696G/C/T Reversible Gundam
FA-93S Full Armor ν Gundam
FF-X7 Core Fighter
G-Sky
G-Bull
MSZ-006 Zeta Gundam
MSZ-006-3A Zeta Gundam 3A Type
MSZ-009M Mega Zeta
ORX-013 Gundam Mk-V
RGM-88X Jeddah
RGM-89 Jegan
RGZ-91 Re-GZ
RGZ-91B Re-GZ Custom
RMS-099 Rick Dias
MSK-008 Dijeh
MSK-008R Rick Dijeh
MSK-008R Modified Rick-Dijeh
MSK-008R Rick Dijeh
MSK-008R Modified Rick-Dijeh
MSZ-000 Zero Shiki
RMS-099B Schuzrum Dias
RX-75-4 Guntank
RX-77-2 Guncannon
RX-78-2 Gundam
RX-78-2 Gundam + B-Parts
RX-78-2 Gundam C-Armor
RX-78-3 Gundam "G-3"
RX-93 ν Gundam
RX-93 ν Gundam Double Fin Funnel Type
RX-93-ν2 Hi-ν Gundam
Vessels Crewed
Garuda-class
Ra Cailum
SCV-70 White Base
Amuro Ray (アムロ・レイ Amuro Rei?) is one of the main characters from the Universal Century timeline. He is the protagonist of Mobile Suit Gundam, a supporting character in the sequel Mobile Suit Zeta Gundam, and the protagonist of Mobile Suit Gundam: Char's Counterattack. A Gundam pilot and a Newtype, he is most famous for piloting the powerful RX-78-2 Gundam during the One Year War.
Contents[hide]
Personality & Character
Skills & Abilities
History
One Year War
Escaping from Side 7
North America
Medea Supply Corps
New York City
Family Reunion
First Encounter with Ramba Ral
Gihren's Speech
Using Guncannon
Leaving White Base
Battle with M'Quve
Confrontation in Sodom
Gryps Conflict
First Neo Zeon War
Second Neo Zeon War
Fate
Relationships
Gallery
See Also
Notes & Trivia
References
External links
Navigation
Personality & CharacterEdit
Amuro's habits indicate him being a 'nerd' in some ways. Throughout the war, Amuro's mental stress and his growing Newtype powers distance him further away from the crew members of the White Base. Through all of Amuro's development, he then begins to lose many people he had cherished, most importantly Lalah Sune, the only person he could telepathically communicate with. At the end of the war, Amuro realizes that the crew of the White Base is the family he belongs to.
By the Gryps War, Amuro has become more of a reclusive person due to being isolated after the OYW. Through his guilt over accidentally killing Lalah, Amuro also has a fear of going into outer space, as told by Mirai Noa. However, Fraw Bow manages to re-ignite his fighting spirit to help the crew of the Argama during their time on Earth. By the Second Neo Zeon War, Amuro has grown into much more of a leader, willing to sacrifice himself for a brighter and more hopeful future.
Skills & AbilitiesEdit
Amuro has a certain knack for mechanics, including building the famous talking ball shaped robot named Haro. Initially, when Amuro pilots the Gundam, he is barely able to fend off aces such as his main rival Char Aznable and Ramba Ral, mostly relying on the sheer incredible power of the Gundam. However, over time, Amuro manages to hone his skills to the point where a mobile suit he pilots needed a field upgrade and tuned to even able to match up to Amuro's immense piloting skill.
On board the first mobile suit he piloted, the RX-78-2 Gundam, he is able to use and fight with it by just looking in the piloting manual for the first time, and destroyed two Zakus at the same time. Amuro is adept at any combat situation he is in, whether in close-combat, middle-range, or even long range encounters at multiple enemies, he is able to fight them in his way without any prior training that makes him earn the title "White Devil". During the Gryps Conflict 7 years latter, his skill never fades, in fact, leading the Karaba (AEUG's earth-bound ally) at successful missions. At UC 93, Amuro is at the peak of his piloting skill, using an inferior mobile suit, the RGZ-91 Re-GZ, and critically damaging Gyunei Guss' MSN-03 Jagd Doga, which was more advanced that time, and is noted that the Re-GZ is not suited for Amuro's expectations until Anaheim Electronics soon delivers to him the RX-93 ν Gundam, which is designed by Amuro himself for the use of his Newtype powers, thus, utilizing his full piloting potential.
In addition to his newtype powers and skills, he's shown use pragmatic and clever tactics over his career, often catching his enemies off guard, such as the feint he used against Gyunei.
HistoryEdit
One Year WarEdit
Escaping from Side 7Edit
FrawinAmuroshouse
Amuro prepares to take shelter
On what seemed an ordinary day in Side 7 on September 18, UC 0079, Amuro was fixing some electronics as he usually did, when Fraw Bow and Haro came over and got him to evacuate to the shelter. However, while they were in the shelter, there was a series of explosions. Two Zeon soldiers, Denim and Gene, were on a reconnaissance mission to find what Project V's mobile suits were. But Gene disobeyed orders and started to attack Side 7.
AmuroFirstGoesInGundamCockpit
Amuro jumps into the Gundam's cockpit for the first time
Amuro went outside of the shelter to find his father. He asks two passing Federation officers where his father is before they die from missiles. The manual of the RX-78-2 Gundam landed next to him. Quickly skimming through the Gundam's flight manual, Amuro decided to defend the colony by activating the Mobile Suit. He managed to destroy Gene's MS-06 Zaku II with the Gundam's Beam Saber. Unfortunately, the resulting explosion created a hull breach in the colony that sucked his father into deep space. Amuro then disabled Denim's Zaku by running the beam saber through the cockpit to avoid an explosion. Shortly afterwards, he is commanded by (then) Ensign Bright Noa. Because Captain Paolo Cassius was injured during the battle with the two Zakus, Amuro was the only pilot available to provide cover for the White Base's escape from the colony.[1]
X5 Char and Amuro fight
Amuro vs Char
The Musai-class light cruiser that kept its distance from the colony attempted destroy the White Base by firing several missiles at the it, but Amuro managed to shoot them down. After escaping Side 7, the White Base crew went to Luna II, but were detained by Admiral Watkein for having civilians controlling the V Project mobile suits. Eventually the White Base crew was freed thank to the dying words of Paolo Cassius, but this lead Amuro into his third encounter with Char Aznable (aka The Red Comet), piloting a MS-06S Zaku II Commander Type A seasoned veteran, Char proved more than a match for Amuro while the legendary ace was unable to shoot down the Gundam due to its technology. After the encounter with Char, the White Base attempted to re-enter the atmosphere and head for the Federation HQ in Jaburo, South America. However, Char attacked the ship during reentry and Amuro was once again called to defend the ship with the Gundam. Though he successfully warded off Char, the Gundam was being pulled into Earth's atmosphere and was unable to return to White Base. Amuro then discovered that the Gundam had a reentry system so it could survive the atmosphere. Landing on Earth safely, Amuro became the first mobile suit pilot to survive reentry.
North AmericaEdit
Both the White Base and the Gundam were severely outnumbered. Amuro by this time was exhausted to the point of collapse. As he exited out of the Gundam to rest, Zeon forces led by Captain Garma Zabi, son of Degwin Sodo Zabi, gathered a force to capture or destroy the White Base and the Gundam. Garma attacked the White Base with a numerical superiority of HT-01B Magella Attack tanks, DFA-03 Dopps, and several Zakus. He personally went into the battle with his own personal customized Dopp. Amuro was soon called back to duty, but Amuro refused to fight, believing that he earned a break with what happened from the time of Side 7 to the current battle. Bright attempted to persuade Amuro to launch in the Gundam immediately, but his words fell on deaf ears. When words ran out, Bright resorted to slapping Amuro for his cowardice. As the battle increased in intensity, Bright gave up on persuading Amuro. Bright left with saying "I would have thought you would want to settle your score with Char but, I underestimated you." Frau Bow was witnessing Amuro's cowardice and told Amuro to give her the flight manual. When this happened, Amuro came back to his senses and went back into the fight. The Gundam was launched in a rapid response to the battle.
During the battle, Amuro managed to destroy numerous Magella Attack Tanks as well as Dopps. It was also during this battle that Amuro had the Gundam jump up into the air to engage the Dopps, making him the first mobile suit pilot to engage in aerial combat. Garma himself attempted to take down the Gundam during this battle Char launched from a Komusai capsule from the Musai and engaged Amuro in aerial combat in his Zaku. Garma called for an immediate retreat to review their situation. The White Base was able to avert destruction and for the moment was safe.
Medea Supply CorpsEdit
Sometime after the battle, a convoy of Medea supply transports arrived to resupply the White Base and take on as many passengers that were refugees from Side 7. Lieutenant Matilda Ajan, the commanding officer, spoke of the troubles Jaburo was having at the moment and the need for good officers were needed if they were to win the war. It was also at this point that Amuro became enamored with Lt. Matilda. After the resupply she advised Bright to head west, but for reasons unknown, he ordered the White Base to head for New York City.
New York CityEdit
The White Base crew knew that if they could break through the city, they would be able to escape Zeon territory. This would turn out to be their most difficult battle yet, as they were en route to New York. Meanwhile, Char attends a party which Garma organized as he was engaged to Icelina Eschonbach, the daughter of the former mayor of New York City; an engagement her father disliked since he believed the Zeon were their enemies.
It was during the party that Char and Garma were alerted of the White Base's position and responded on a moments notice. As the White Base was entering the city, Amuro believed the situation to be too dangerous and asked permission from Bright to have the Gundam be used as a decoy. This plan was to draw off Zeon forces as the White Base makes their escape. However, Bright disapproved of this idea because he felt it was too risky. However, the White Base finds a sports dome that they were able to hide in and decide not to launch any mobile suits.
Garma and Char carpet bombed the area to draw out the White Base, but to no avail. Char then volunteers to personally search for the White Base along with two other pilots. As the Zakus launch, the White Base launches the Gundam as a decoy to lure the mobile suits away from the ship and subsequently, the main fleet. Soon afterwards, Char engages the Gundam in combat, noting that the pilot is getting better.
This did not prevent Char from discovering White Base's position. However, Char, seeking vengeance on the Zabi family, instead of telling Garma that the White Base is in the sports dome, tells Garma that it is in front of his forces. Garma's fleet is quickly obliterated and Char admitted to Garma his betrayal. Garma then attempts to ram the Gaw into the White Base, but is unsuccessful. The White Base escapes from Zeon territory afterwards.
Family ReunionEdit
The White Base lands on a beach and decide to take a short leave. While repairing various damages on the ship, Amuro takes a Core Fighter to find his mother who stayed on Earth while him and his father migrated to Side 7, years ago.
As he enters his old home, he only finds drunk Federation soldiers lying in the living room. The soldiers tell him the house had been empty for some time. The only thing left is a doll that Amuro once had. As Amuro remember his past, he spots Federation soldiers harassing an elderly woman. As Amuro attempts to stop the soldiers from harassing her, Amuro is beaten down. The old lady recognized Amuro and told the soldiers to stop. Amuro told her how he found the house empty and the old lady tells him that his mother had been working as an assistant in a field medical hospital. Amuro heads there quickly in his Core Fighter. As he lands, the civilians ask him why he is here (seeing his uniform) and tell him that there is a Zeon base on top of a mountain nearby.
His mother, Kamaria Ray, arrived to see what the commotion was about and saw her son for the first time in years. Both were relieved to find each other alive. Amuro and his mother shared stories as well as Amuro telling of how his father went missing after the incident in Side 7. Suddenly, two Zeon soldiers burst in the room. Amuro hid under a blanket so he would not get caught. The Zeon soldiers attempted to persuade the people to give them information on the Core Fighter that landed through bribery but did not succeed. As they were about to leave, Amuro's communicator went off as the White Base was attempting to contact him. As the soldiers went over to the bed, Amuro's mother told them that he was very sick. As the soldier got closer, Amuro shot him through the blanket. Amuro fired his gun at the escaping man until his bullets ran out. The civilians were upset since Zeon forces would believe the field hospital was nothing more than a Federation hide out.
Amuro then reported to the White Base which reported Zeon forces in the area and ordered him to return. Amuro's mother did not understand why he shot the man. Amuro harshly tells his mother that's what war is, though his mother believes that's no excuse for his actions. As Amuro was about to take off in his Core Fighter, his mother expressed her complete shame of being his mother. Amuro discovers the airfield belonging to the Zeon base and begins attacking it immediately. Although his mother's words begin to affect him, Amuro shrugs it off and continues his attack on the airfield. Unfortunately, Lt. Matilda, who was in the area, had plans to raid the air base of its supplies. Lt. Matilda saw what Amuro was doing and ordered him to stop. Almost all the supplies were destroyed during Amuro's attack in his Core Fighter, so Amuro & Matilda head to the White Base. During this time Bright receives a promotion to Lieutenant Junior Grade.
Matilda also speaks to him about Operation Odessa, the planned Federation counter-offensive in Europe and the term "Newtype" which the Zeon forces were looking into. Matilda told Bright that "Newtypes" were supposedly the next step of human evolution; a theory that was part of the philosophy of Zeon Zum Deikun, the former leader of the Republic of Zeon. Before take off, Amuro visits his mother again. With Bright standing next to him, Amuro tells his mother that he has obligations and responsibilities now and cannot abandon the White Base. His mother reluctantly accepts this and Amuro salutes her. Bright then salutes her as well and promises Amuro's mother that he will look after Amuro like a brother. As the White Base takes off, Amuro's mother collapses and wonders what happened to the boy she once raised.
First Encounter with Ramba RalEdit
The White Base then headed toward the European continent. During this time Amuro begins to exhibit signs of combat fatigue. As Fraw Bow and Haro go into Amuro's quarters to give him lunch, Haro observes that Amuro is not feeling well, but he tells Haro he's fine. Amuro takes a break, but his combat fatigue remains. Meanwhile a Zanzibar-class mobile cruiser follows the White Base and begins attacking it. The person in the Zanzibar is Lieutenant Ramba Ral. Ramba Ral was ordered by Vice-Admiral Dozle Zabi, commander of the Space Attack Fleet stationed in Solomon Asteroid Base. His orders were to destroy the Gundam and the White Base which came following the death of Garma Zabi. Ramba soon chases the White Base through a thunder storm but loses the White Base in his chase.
The White Base was soon able to land on a nearby island, however they were soon found by a recon unit launched by Ramba Ral. As they were caught, Bright ordered Amuro to launch immediately, but Amuro's combat fatigue worsened. Ryu had to personally come get him and attempt to force him to come back to
04 Gouf vs Gundam
Amuro vs Ramba
reality. Ryu was unsuccessful in the attempt and hoped Amuro would come to as he strapped him in the Gundam cockpit. As the Gundam, Guntank and Guncannon launched, they faced three adversaries: Cozun and Acous in regular Zaku IIs, but one unfamiliar, MS-07 Gouf prototype which was piloted by Ramba Ral. As Ramba Ral attacked Amuro more aggressively, Amuro committed himself fully to the battle but Ral pushed Amuro back and retreated. His wife, Crowley Hamon, aboard the Zanzibar cruiser releases blinders to cover their escape and Amuro is left wondering if he let them escape or they let him live.
Gihren's SpeechEdit
Against his father's wishes, Gihren holds a state funeral to commemorate Garma. As the speech progresses, Amuro is amazed by Gihren's words; Bright however is disgusted by it as he believes that the Zabis are nothing more than dictators.
Using GuncannonEdit
During the White Base's stay on the Asian continent, communications officer Sayla Mass deployed in the midst of battle between them and Ramba Ral with hopes of contacting Zeon forces for information on her brother, who may have joined the Zeon. Amuro decides to sortie in RX-77 Guncannon to save both Sayla and the Gundam. Amuro manages to destroy Acous' Zaku, disable Cozun's Zaku, and force Ral to retreat.
Leaving White BaseEdit
50884-episode 17 28 super
Amuro overhears Brights doubts
Shortly afterwards the White Base ran into one of M'Quve's mines. Bright ordered Amuro to deploy in the Gundam but Amuro went against orders and deployed in the Guntank with Hayato. He managed to destroy the base but was forced to retreat when Ral arrived. As a result Bright felt that Amuro's piloting of the Gundam has made him both more self-centered and overconfident in his abilities. He shares this information with navigator Mirai Yashima in private. However, Amuro, sleeping in the control room, overhears their conversation and impulsively launches with the Gundam into the night.
Battle with M'QuveEdit
Amuro, having taken Gundam from White Base, stumbled upon a small mining base which he believed to be the mine which was the target of Operation Odessa. After taking out some buildings and gun turrets, he is attacked by a hovering mobile armor, the MAX-03 Adzam piloted by Kycilia Zabi and her right hand man M'Quve. The two gain the upper hand on Gundam when they deploy the Adzam's leaders, but Amuro manages to shake off the dust in time and slice off the top of the mobile armor. M'Quve immediately destroys the base under pressure from Kycilia due to it being a major source of solium and her refusal for the Federation to get their hands on it. Amuro later found out that this was not the target of Operation Odessa.
Confrontation in SodomEdit
Burying Gundam in the heavy sand dunes, Amuro travels into a small town, Sodom for food. At the same time, the crew of the White Base looks in disgust at the base Amuro recently destroyed. Both Ryu and Bright agree that Amuro's careless actions have put the Zeon forces on alert. Fraw in frustration, departs White Base in a buggy to search for Amuro.
While in Sodom, Amuro eats alone in the restaurant until a group of Zeon forces, led by Ramba Ral and Hamon, enter the bar. While Hamon flirts with Amuro, one of the Zeon soldiers grabs Fraw, who immediately says Amuro's name. Ramba orders his men to let Amuro and Fraw leave the bar, but not after telling Amuro, "You've got the eyes of a soldier." and telling him that they will fight as enemies on the battlefield. While Amuro rests in the sand, he sees the Gouf and a Zaku fly overhead. Realizing that the Zeons followed Fraw back to White Base, Amuro sorties in the Gundam to save his comrades. He is able to resolve the situation but Bright imprisons him for going AWOL. Nonetheless he is released and is allowed to continue piloting the Gundam.
Gryps ConflictEdit
AmuroRayUC0087
Amuro (age 23) as a member of Karaba in Zeta (0087 U.C.)
Amuro was placed under house arrest shortly after the war due to the government's mistrust of Newtypes. While he lived in a luxurious mansion (possibly paid for by either royalties from patenting his Haro design as popular toys, or abundant war pensions for his military service) and was officially free to come and go as he pleased, Amuro's house servants were actually government agents assigned to keep track of his movements. Amuro worked as a trainer/adviser in the Cheyenne Mobile Suit Academy up until the time of the Gryps Conflict. He suffered from chronic combat fatigue, as commented by Emma Sheen and Beltorchika Irma, likely from his traumatic experience during the One Year War and the sense of guilt over killing Lalah Sune.
During the Gryps Conflict, a pregnant Fraw Bow, with her three adopted children, came to visit Amuro. They managed to re-ignite Amuro's fighting spirit and helped him escape from his government handlers. After joining the Karaba (AEUG's earth-bound ally), Amuro became a key figure within the group, leading several crucial missions, including the attack on the Titan's base in Mount Kilimanjaro and the seizing of Federation's Congress Building in Dakar. After the operation in Dakar, and the AEUG's return to space, Karaba receives their new shipment of mass-produced Zeta Gundams, the MSZ-006A1 Zeta Plus A1's to enhance their fighting strength. Amuro was given a Zeta Plus in his custom colors and was made commander of the 18th Tactical Fighter Aggressor Squadron (18TFAS) as part of the Karaba Air Force, and would be of great use in fighting both the remaining Titans on Earth, and the newly emerged Neo-Zeon.
First Neo Zeon WarEdit
With the defeat of the Titans and subsequent end of the Gryps Conflict, both the AEUG and Karaba turned their attention towards the new threat that appeared during the war, Neo Zeon and its leader Haman Karn. As the AEUG had been greatly weakened in the previous battle, Karaba, whose strength remained mostly intact, sent a good amount of their pilots to into Space to back up the AEUG.
Howaitokon
Amuro as the "White Unicorn" in Gundam Evolve
In Gundam ZZ Hayato Kobayashi reveals that Amuro was among those who were sent to space to fight Neo-Zeon (episode 35), though Amuro himself never appears in the series. In Gundam Evolve, it is revealed that after his transfer Amuro was made part of a special team of pilots that were to pilot three new Zeta Gundam units, with Amuro as the team leader. So to hide his identity from the enemy, thereby taking them by surprise, Amuro was given the code name White Unicorn and was assigned the MSZ-006-3A Zeta Gundam 3A Type to pilot. He and his team, consisting of Red Snake (Yurii Ajissah) and Gray Wolf (Shin Matsunaga), would be critical in repelling the Neo-Zeon forces throughout the First Neo Zeon War (though they did not participate in the final battle).
Second Neo Zeon WarEdit
Amuroray
Amuro (age 29) as a member of Londo Bell (0093 U.C.)
After the First Neo-Zeon War, Amuro joins the Earth Federation's Londo Bell group led by Bright Noa, and served as the combat squad commander. During the Second Neo-Zeon War, Amuro is assigned to the battleship Ra Cailum, Londo Bell's flagship, as the leader of the ship's mobile suit squads. Amuro initially pilots the RGZ-91 Re-GZ, but Anaheim Electronics soon delivers to him the RX-93 ν Gundam, a highly advanced mobile suit largely designed by Amuro himself. It is widely believed that his relatively low status in the Earth Federation is a sign of the government's continued mistrust in Newtypes.
Char and amuro punching
Amuro encounters Char in Londenion and the two rekindle their rivalry with a fist fight
At the end of the Second Neo-Zeon War, after defeating Char's MSN-04 Sazabi in the duel and capturing Char's escape pod, Amuro attempted to singlehandedly stop the asteroid Axis from colliding with the Earth by pushing the asteroid with his ν Gundam. His action inspired other mobile suit pilots to join in, even Neo-Zeon soldiers. Although he eventually succeeded, the act overloaded ν Gundam's psycoframe construct. Both he and Char disappeared in a magnificent aurora, thus ending his long-time legacy of combat since the One Year War and concluding the most famous Mobile Suit Gundam rivalry at last.
FateEdit
Amuro's fate differs between the novelization of Mobile Suit Gundam and official timeline. In the novels, Amuro is killed by Char's 300th Autonomous Newtype Corp before the Battle of A Baoa Qu even ends. The official timeline mark Amuro's death 13 years later in the Second Neo Zeon War, which is reflected in the original novels Hi-Streamer and Beltorchika's Children. However, in the animation and in the related games, both Char and Amuro are listed as MIA.
In the final episode of Mobile Suit Gundam Unicorn, Amuro is seen as a wandering spirit alongside Char and Lalah, implying, if not confirming, that he and Char have passed on.
RelationshipsEdit
Lalah Sune
Amuro first met the artificial Newtype girl on the lakeside of Side 6, and immediately developed a friendship. He later sensed Lalah Sune's Newtype ability when fighting Char's Gelgoog in Side 5's Texas Colony, and came back to White Base in an abnormally different mood. Their encounter ended tragically when Amuro accidentally killed Lalah when she flew in and blocked Amuro's critical strike towards Char with her Elmeth mobile armor.
Amuro and Lalah's relationship is an ambiguous one. Being an emerging Newtype, Amuro often felt lonely and struggled to achieve real understanding from his fellow crews. Lalah, also a Newtype, was the first person Amuro could truly relate himself to. As a result, Amuro hated Char deeply for sending Lalah into war. He often reminisced over Lalah's death, feeling guilty to the point he refused to return to space in the fear of seeing Lalah's ghost. It is said by other White Base members her death affected him greatly, and Lalah is considered by many to be Amuro's first great love. After he finally got over his guilt, they on occasions had spiritual conversations, which left a personality influence and disrupted Amuro's relationships with other female admirers such as Beltorchika Irma, Chan Agi and Quess Paraya. Amuro apparently is the only individual who has such a profound bonding to Lalah, as Char is never shown to have such level of spiritual connection in the TV series or the movie.
Sayla Mass
Amuro & Sayla
Amuro and Sayla
Though not explicitly stated in the series, it is implied that Amuro develops a close relationship with fellow crew member Sayla Mass. Both have been thrust into the One Year War and both come to learn that they are Newtypes. At the end of the series, Amuro and Sayla discover that they have the ability to communicate telepathically to each other. When Amuro and Char engage in vengeful combat at A Baoa Qu, Sayla openly shouts for them not to continue fighting, worried that either or both of them will be killed.
Sayla and Amuro kiss
Hiroyuki Kitazume illustration of Amuro and Sayla's relationship as depicted in the novel.
The novelization of Mobile Suit Gundam is even more obvious about a romance between Amuro and Sayla. Some time after they are both assigned to White Base, Amuro asks Sayla out to dinner. The two of them eat and chat, and discuss what it's like to be Newtypes. Later, Sayla visits Amuro in his quarters after-hours and the two of them have sex, thus starting a very intense relationship between them. When Amuro is killed by Char's mobile suit forces at the end of the story, Amuro's mind takes one last moment to reach out to Sayla's and expresses his love for her, along with his regret at not being able to spend his life with her. Sayla returns the affection and later tells her brother that he killed the man she loved. At the end of the war, Sayla communicates to Amuro's consciousness, and he tells her that he is with her.
Beltorchika Irma
Chan Agi
GalleryEdit
AmuroRay
01. Amuro Ray
Amuro2
Amuro
Amuro in a rare blue pilot suit seen in the opening of TV anime MSG.
AmuroGundamIntructions
Discovering the Gundam's manual
Amuro
Amuro Zeta
23, U.C. 0087
Amuro3
23, U.C. 0087
-animepaper net-picture-standard-anime-mobile-suit-zeta-gundam-zeta-gundam-200710-nat-preview-3d8c2aee
Amuro and Beltorchika Irma in Mobile Suit Zeta Gundam
Amuro-Ray-Beltorchka
Amuro and Beltorchika in Hong Kong
144779
Amuro Ray Gundam War Card
Amuro.Ray.full.424641
Amuro Ray and Dijeh
Amuro ray 0093 3799
29, U.C. 0093, in uniform
Dwg2-amuro-ray
29, U.C. 0093, in pilot suit
Amuro Emblem 02
Amuro Ray's personal emblem 1 (U.C. 0087-0093)
Amuro Emblem 01
Amuro Ray's personal emblem 2 (U.C. 0093)
Amuro's Miracle
Amuro Ray pushing Axis in his ν Gundam (Gundam Perfect File)
Amuro Final Moments
Amuro Ray's final moments
C8c3b5373b1f438bff900e5b5cf5cef11226724112 full
Amuro Ray in Gundam Evolve 5 : RX-93 ν Gundam
5 – RX-93 ν Gundam.mkv 000121816
Amuro Ray in Gundam Evolve 5 : RX-93 ν Gundam
20061028 272167
Amuro Ray in Gundam Evolve 9
AmuroRay-1
AmuroRay-2
AmuroRay-Pilot-1
AmuroRay-Pilot-2
Img 1216672 37836657 0
Img 1216672 37836657 1
Img 1216674 37953440 0
Img 1216674 37953440 1
Img 1216674 37953441 0
Img 1216674 37953441 1
Img 1216674 37953443 0
Img 1220874 39355692 0
Img 1220874 39355692 1
AMURO RAY
Kill counts by Amuro Ray during One Year War
Nn
Amuro's cameo in Gundam Unicorn
Amuro amuro 01
Amuro Ray and Namie Amuro (scene from music video)
MoonGundam Episode01 p06 AmuroRay Sep2017
Amuro Ray as seen on Mobile Suit Moon Gundam
N20061221 zeon 24
Amuro in Mobile Suit Gundam: Spirits of Zeon ~Dual Stars of Carnage~
Mobile Suit Gundam 40th anniversary project (Visual A)
With RX-78-2 Gundam and Banagher Links in key visuals for Gundam 40th Anniversary "Beyond"
Tony Takezaki Illustration Amuro Ray
Tony Takezaki Illustration
Character Profile Amuro Ray pilot suit
Character Profile Amuro Ray
Amuro ray 0001
Amuro ray 0002
Amuro ray 0003
Amuro ray lb 0002
Amuro, Bright, Chan, Kayra
Amuro piloting Re-GZ
SD Amuro Illustration by CLAMP
SD Illustration by CLAMP (Newtype Magazine)
See AlsoEdit
Amuro Forever
Notes & TriviaEdit
Amuro Ray and Gundam are both playable characters from the start in Dynasty Warriors Gundam, Dynasty Warriors Gundam 2, and Dynasty Warriors Gundam 3 with ν Gundam playable from the start as well.
Amuro is considered one of the stalwarts of the Super Robot Wars series of video games, despite not appearing in all of the incarnations of the series. He is seen as the archetype of the Real Robot pilot, a reluctant hero thrust into war at the controls of a powerful prototype weapon. As a result, he is ranked along with Kouji Kabuto and Ryouma Nagare as the premiers of their respective archetypes (Amuro representing Real Robots, Kouji representing Super Robots and Ryouma representing Transforming/Combining Robots). In fact, most of his appearances in the more recent SRW games featuring U.C. timeline Gundam has him being revered and respected by other anime characters as a legendary pilot and soldier.
Particularly so in the Alpha series as by the time the third game rolls around, Amuro as well as other characters who have been in the series (Heero, Bright, Kouji to name a few names) are regarded very highly by the game's newcomers. Mwu is embarrassed by Amuro's praise in one part.
Amuro's appearance depends on what focus, if any, an SRW game with himself as a character is focused on. If multiple UC series are represented, his appearance will default to how he was portrayed in Zeta Gundam. Games where the original series features prominently will default to his original series appearance. It is very rare for his CCA-era depiction to be used in standalone titles, and typically is only used in sub-series like the Alpha and Z series, and then only in games when the Char's Counterattack story is the main focus.
In games which include both Amuro and Neon Genesis Evangelion, Misato Katsuragi often has a crush on Amuro (this is a seiyū in-joke, common in many of the games, referring to their seiyuus' role as Sailor Moon and Tuxedo Kamen).
Amuro Ray's first nickname, the White Devil, is also a fan nickname for another anime character - Nanoha Takamachi, the titular heroine of the magical girl franchise Magical Girl Lyrical Nanoha. It probably doesn't help that the character herself was influenced by the Gundam franchise itself.
Amuro's seiyuu, Tōru Furuya, also voiced Ribbons Almark in Mobile Suit Gundam 00. At the same time, Furuya used also used a pseudonym Noboru Sougetsu in the cast of Mobile Suit Gundam 00 for Ribbons Almark's role (but used his real name in the narration role). Both the narration role and Ribbons mark Furuya's first role in a non-Universal Century Gundam series. Shuuichi Ikeda who played Char had his earlier with Gilbert Durandal in Gundam SEED Destiny.
Amuro's English voice actor, Brad Swaile, also voiced Setsuna F. Seiei in Mobile Suit Gundam 00, making him the only voice actor to voice the primary protagonist in multiple Gundam series, in addition to his performance as Quatre Raberba Winner in Mobile Suit Gundam W. While Steve Staley also voiced multiple protagonists, his were limited to films and OVA's. Matthew Erickson also voiced both Amuro in Mobile Suit Zeta Gundam and Shin Asuka in Mobile Suit Gundam SEED Destiny, but he portrayed Amuro in a production in which he was not the protagonist.
Amuro is the second main protagonist of a Gundam series that become a pilot of a Gundam he personally designed himself with the RX-93 ν Gundam. The first was Kamille Bidan.
Amuro is the first of many main protagonist to pilot a Gundam made by his parent.
In recent SD Gundam G Generation games, Amuro (0079/MSG ver) starts out with a unique skill called "White Ghost" (one of his titles during the OYW) that boosts his MS's attack and mobility by an amount (maxing out at 25) when piloting any white MS or Gundam types. Considering most of the best MS in the games are Gundam types, this skill is very powerful.
It has been speculated in Gundam crossover games that Amuro and Kira Yamato of Gundam Seed would easily befriend each other, due to many shared and parallel similarities, both being heroic messiah like characters, and having powers that make them unique and more powerful than most of the pack. This is really strongly showed in Dynasty Warriors Gundam 3, where Amuro was quick to like Kira after he single-handedly fought off Ribbons' army, just to save and defend Chan who was stranded in the middle of the battle at the time.
An episode of the anime Space Dandy had a parody of Amuro's likeness as an alternate reality's version of Dandy, who was a "Mobile Suit" Pilot.
Amuro Ray made a cameo appearance in the music video of "Defend Love", as a collaboration with Japanese pop singer Namie Amuro. He can been seen battling Namie's customized Elmeth in his RX-78-2 Gundam.
In 2014, Tōru Furuya, Amuro's japanese voice actor, sat in the cockpit of Suidobashi Heavy Industries' Kuratas, which will be used in the first ever robot duel against the MegaBot's Mk. II.
Amuro is the Federation's second highest scoring ace of the OYW behind Tenneth A. Jung and ahead of Lydo Wolf.
ReferencesEdit
↑ Mobile Suit Gundam Episode 1, Gundam Rising
External linksEdit
Amuro on Wikipedia
NavigationEdit
[show]Earth Federation Forces Earth Federation Forces flag
[show]
Mobile Suit Gundam characters
[show]
Zeta Gundam characters
[show]
Char's Counterattack characters
[show]
Universal Century characters
Amuro Ray
Actors
Tōru Furuya + , w:c:english-voice-over:Brad Swaile + , w:c:english-voice-over:Michael Lindsay + , w:c:english-voice-over:Matthew Erickson +
Affiliation
Earth Federation Forces + , Anti Earth Union Group + , Karaba + , Londo Bell +
Age
15 + , 23 + , 16 + , 29 +
Birth date
November 6, 0063 JL +
Death date
March 14, 0093 JL +
English Title
Amuro Ray +
Era
Universal Century +
Eye Color
Brown +
Gender
Male +
Genetic Type
Newtype +
Hair Color
Brown +
Names
The White Devil + , White Shooting Star + , White Unicorn +
Nation
Earth Federation +
Occupation
Mobile Suit Pilot +
Person Height
168 cm (5.512 ft, 66.142 in) + , 180 cm (5.906 ft, 70.866 in) +
Rank
Chief Petty Officer + , Ensign + , Lieutenant + , Captain (AEUG) +
Series
Mobile Suit Gundam + , Mobile Suit Gundam I + , Mobile Suit Gundam II: Soldiers of Sorrow + , Mobile Suit Gundam III: Encounters in Space + , Mobile Suit Gundam: Secret Rendezvous + , Mobile Suit Zeta Gundam + , Gundam Neo Experience 0087: Green Divers + , Mobile Suit Gundam: Char's Counterattack + , Mobile Suit Gundam: Char's Counterattack - Beltorchika's Children + , Mobile Suit Gundam: Char's Counterattack - High Streamer + , Gundam Evolve + , Mobile Suit Gundam: Char's Counterattack - Beltorchika's Children (Manga) + , Mobile Suit Gundam: Journey to Jaburo + , Gundam 0079 - Nightmare of Solomon + , Mobile Suit Moon Gundam + , Mobile Suit Gundam: Federation vs. Zeon + , Dynasty Warriors Gundam + , Dynasty Warriors Gundam 2 + , Dynasty Warriors Gundam 3 + , Dynasty Warriors Gundam Reborn + , Mobile Suit Zeta Gundam: A New Translation - Heir to the Stars + , Mobile Suit Zeta Gundam: A New Translation II - Lovers + , Mobile Suit Zeta Gundam: A New Translation III - Love Is the Pulse of the Stars + , Mobile Suit Gundam 0079 + , Mobile Suit Gundam: Char's Counterattack + , Mobile Suit Gundam: Awakening + , Escalation + , Confrontation + , Mobile Suit Zeta Gundam + , Mobile Suit Gundam ZZ + , Mobile Suit Zeta Gundam Define + , Mobile Suit Z Gundam II Lovers + , Mobile Suit Zeta Gundam Heir to the Stars +
Species
Human +
Has query
Amuro Ray + , Amuro Ray + , Amuro Ray + , Amuro Ray + , Amuro Ray + , Amuro Ray + , Amuro Ray + , Amuro Ray + , Amuro Ray + , Amuro Ray + , Amuro Ray + , Amuro Ray + , Amuro Ray + , Amuro Ray + , Amuro Ray + , Amuro Ray + , Amuro Ray + , Amuro Ray + , Amuro Ray + , Amuro Ray + , Amuro Ray + , Amuro Ray + , Amuro Ray + , Amuro Ray + , Amuro Ray + , Amuro Ray + , Amuro Ray + , Amuro Ray + , Amuro Ray + , Amuro Ray + , Amuro Ray + , Amuro Ray + , Amuro Ray + , Amuro Ray + , Amuro Ray + , Amuro Ray + , Amuro Ray + , Amuro Ray + , Amuro Ray + , Amuro Ray + , Amuro Ray + , Amuro Ray + , Amuro Ray + , Amuro Ray + , Amuro Ray + , Amuro Ray + , Amuro Ray + , Amuro Ray + , Amuro Ray + , Amuro Ray + , Amuro Ray + , Amuro Ray + , Amuro Ray + , Amuro Ray + , Amuro Ray + , Amuro Ray + , Amuro Ray + , Amuro Ray + , Amuro Ray + , Amuro Ray + , Amuro Ray + , Amuro Ray + , Amuro Ray + , Amuro Ray + , Amuro Ray + , Amuro Ray + , Amuro Ray + , Amuro Ray + , Amuro Ray + , Amuro Ray + , Amuro Ray + , Amuro Ray + , Amuro Ray + , Amuro Ray + , Amuro Ray + , Amuro Ray + , Amuro Ray + , Amuro Ray + , Amuro Ray + , Amuro Ray + , Amuro Ray + , Amuro Ray + , Amuro Ray + , Amuro Ray + , Amuro Ray + , Amuro Ray + , Amuro Ray + , Amuro Ray + , Amuro Ray + , Amuro Ray + , Amuro Ray + , Amuro Ray + , Amuro Ray + , Amuro Ray + , Amuro Ray + , Amuro Ray + , Amuro Ray + , Amuro Ray + , Amuro Ray + , Amuro Ray + , Amuro Ray + , Amuro Ray + , Amuro Ray + , Amuro Ray + , Amuro Ray + , Amuro Ray + , Amuro Ray + , Amuro Ray + , Amuro Ray + , Amuro Ray + , Amuro Ray + , Amuro Ray + , Amuro Ray + , Amuro Ray + , Amuro Ray + , Amuro Ray + , Amuro Ray + , Amuro Ray + , Amuro Ray + , Amuro Ray + , Amuro Ray + , Amuro Ray + , Amuro Ray + , Amuro Ray + , Amuro Ray + , Amuro Ray + , Amuro Ray + , Amuro Ray + , Amuro Ray + , Amuro Ray + , Amuro Ray + , Amuro Ray + , Amuro Ray + , Amuro Ray + , Amuro Ray + , Amuro Ray + , Amuro Ray + , Amuro Ray + , Amuro Ray + , Amuro Ray + , Amuro Ray + , Amuro Ray + , Amuro Ray + , Amuro Ray + , Amuro Ray + , Amuro Ray + , Amuro Ray + , Amuro Ray + , Amuro Ray + , Amuro Ray + , Amuro Ray + , Amuro Ray + , Amuro Ray + , Amuro Ray + , Amuro Ray + , Amuro Ray + , Amuro Ray + , Amuro Ray + , Amuro Ray + , Amuro Ray + , Amuro Ray + , Amuro Ray + , Amuro Ray + , Amuro Ray + , Amuro Ray + , Amuro Ray +
Categories list
Characters
, ,
, Deceased
Modification date
11:56:36, 8 June 2019 +
Page has default form
Character +
hide properties that link here
Second Neo Zeon War +
Character
Garuda-class + , Ra Cailum + , SCV-70 White Base +
Crew
Base Jabber + , CB-9696G/C/T Reversible Gundam + , FA-93S Full Armor ν Gundam + , FF-X7 Core Fighter + , G-Bull + , G-Sky + , MSK-008 Dijeh + , MSK-008R Modified Rick-Dijeh + , MSK-008R Rick Dijeh + , MSZ-000 Zero Shiki + , MSZ-006 Zeta Gundam + , MSZ-006-3A Zeta Gundam 3A Type + , MSZ-009M Mega Zeta + , ORX-013 Gundam Mk-V + , RGM-88X Jeddah + , RGM-89 Jegan + , RGZ-91 Re-GZ + , RGZ-91B Re-GZ Custom + , RMS-099 Rick Dias + , RMS-099B Schuzrum Dias +
... Pilot
Amuro +
redirect page
Start a Discussion Discussions about Amuro Ray
If you could change or add anything in the Universal Century from The Origin to Victory, what would it be?
79 messages
Shadow2436
I think I would add: Seeing more Titan members defect after Darkar Seeing if the Albion Crew members defercted from the Titans or at le... 6 months ago
Ifnsman
I admit that I'd probably also write Hathaway out of existence. I've never liked him as a character. However, I am curious enough... 5 months ago
I think I know who Full Frontal actually is in the anime and OVA at least. (Super Big Spoilers)
11 messages
Drakosxiii
Another thing, MSG-UC takes place in UC-0093, Char was born in UC-0059, which would only make him 33 during the events of Unicorn. 7 months ago
Drakosxiii
Sorry, 34 7 months ago
See more discussions >
Categories:
Characters Universal Century characters Male Deceased Add category
Languages:
日本語
Recent Wiki Activity
SD Gundam World Sangoku Soketsuden
KachiExa • 6 minutes ago
Mahdi Garvey
Dr. Dementor • 58 minutes ago
Blex Forer
Dr. Dementor • 1 hour ago
Emma Sheen
Dr. Dementor • 1 hour ago
Help us grow The Gundam Wiki!
GET STARTED
Live! Chat
START A CHAT
Popular Pages
Breaking Down the Future of the MCU
Breaking Down the Future of the MCU
Fandom
XXXG-00W0 Wing Gundam Zero
Char Aznable
Amuro Ray
RX-78-2 Gundam
EXPLORE
GAMES
MOVIES
TV
WIKIS
FOLLOW US
OVERVIEW
About
Careers
Press
Contact
Terms of Use
Privacy Policy
Global Sitemap
Local Sitemap
COMMUNITY
Community Central
Support
Fan Contributor Program
WAM Score
Help
THE FANDOM APP
Take your favorite fandoms with you and never miss a beat
ADVERTISE
Media Kit
Contact
The Gundam Wiki is a FANDOM TV Community.
Follow My Tools Customize Shortcuts
633
« on: June 11, 2019, 12:09:31 PM »
These Raid battles look a bit more interesting than I thought they would.
Also looks like you can catch KOed Pokémon (at least in raid battles)
634
« on: June 11, 2019, 12:07:07 PM »
Spoiler although without banjo and botw 2 announced, it was a 4/10 direct
What, were you not impressed by: Anime Mans: The Game Anime Mans: The Other Game Other Anime Mans: The Game Other Anime Mans: The Other Game Mobile Suit Shulk And more blatant Rule 34 bait from Pokèmon
635
« on: June 11, 2019, 02:12:32 AM »
I liked the Infinite cinematic trailer. But Halo 5's was interesting and ended up not even being close to what the game was like. I expect the same for this one.
Im going to stay optimistic, but I dont blame you one bit man. I just hope this isnt a full regression to good Cortana or i'll be pissed. Im still pissed she's back to begin with. Halo 5's story was mankind's biggest mistake. At least they did something good with it in Halo New Blood.
636
« on: June 10, 2019, 05:17:05 PM »
So what got shown?
637
« on: June 10, 2019, 12:13:23 AM »
So was the Commander Keen thing real or a joke?
That whole Conference was a joke
638
« on: June 09, 2019, 08:49:30 PM »
This Conference was absolute shite overall.
Nintendo please save us.
639
« on: June 09, 2019, 08:45:09 PM »
Doom looks great
640
« on: June 09, 2019, 08:20:35 PM »
Oh hey something that looks cool
641
« on: June 09, 2019, 08:09:42 PM »
You guys all have phones right?
642
« on: June 09, 2019, 08:01:02 PM »
Bethesda Guys: *Literally fucking nothing*
Audience: WOOOOOOOOOOOOOLOOOOONHGJKOOOOOOOJV G GHIOOOKKOOOOOOOOOOOOOOOOOOHHFHJOOOOOXGJFIOOOOOOOO OOOOOO THE OOONOOIIIOOOOOOOOOOOOOOOOIOOOHUIOOOOOOKIOONOOOK
643
« on: June 09, 2019, 07:53:49 PM »
What the fuck is everyone even cheering for?
644
« on: June 09, 2019, 07:48:43 PM »
Bruh
Look at these DUUUUUUUUUUUDES
645
« on: June 09, 2019, 04:40:49 PM »
646
« on: June 09, 2019, 04:36:27 PM »
Nanamachinces changed Chiefs armor again I see
It's Mjolnir Mark-3
647
« on: June 09, 2019, 04:35:55 PM »
I don't like this implication that Chief is taking Cortana back.
648
« on: June 09, 2019, 04:14:28 PM »
So Call of Duty Modern Warfare?
649
« on: June 09, 2019, 04:11:27 PM »
It has Mobile Suits. I'll try it
650
« on: June 09, 2019, 04:04:55 PM »
Lego Forza is cute
651
« on: June 09, 2019, 03:40:05 PM »
Micrsoft Flight Sim looks sick.
652
« on: June 09, 2019, 03:29:10 PM »
GameStop's worst nightmare has finally come true
653
« on: June 09, 2019, 03:18:11 PM »
Jedi: Fallen to Sleep
654
« on: June 09, 2019, 03:14:02 PM »
I also love how Ninja Theory threw arround the DMC Devil May Cry credits as if that wasn't the most reviled garbage.
655
« on: June 09, 2019, 03:11:34 PM »
Who TF asked for Minecraft Diablo?
656
« on: June 08, 2019, 05:47:06 PM »
 Final roster leaked
657
« on: June 08, 2019, 03:18:58 PM »
Literally Jedi Fallen Order
658
« on: June 08, 2019, 01:51:55 PM »
Premium-Eras-legendsPremium-Era-impPremium-Era-rebPremium-Era-newPremium-DefeaturedIconPremium-Era-SprotectPremium-Era-Mprotect
in:
Pages with missing permanent archival links, Legends articles, Wookieepedia former featured articles, and 6 more
Death Star
View source
Share
Tab-canon-black Tab-legends-white
For other uses, see Death Star (disambiguation).
Leia holo
Help me, Obi-Wan Kenobi. You're my only hope.
This article or section is in need of referencing per Wookieepedia's sourcing guidelines.
This article needs appropriate citations. Help us improve this article by referencing valid resource material. Remove this notice when finished.
[Hide]
Death Star
Usage
Affiliation
Geonosian Industries
Order of the Sith Lords
Confederacy of Independent Systems
Galactic Empire
[Source]
"Don't be too proud of this technological terror you've constructed."
―Darth Vader[src]
A Death Star was a moon-sized Imperial military battlestation armed with a planet-destroying superlaser.
The Death Stars, whose concept had been explored even before the Clone Wars, were the first in a long series of superweapons developed to execute the Tarkin Doctrine. The Death Star was designed to allow Emperor Palpatine to more directly control the Galactic Empire through fear. In most instances, a Death Star was to be commanded by a Moff.
One Death Star was completely built by the Empire, with a second and third one never reaching full completion, as well as a prototype being in existence. In addition, a scaled-down version, the Tarkin, and a Hutt knockoff, the Darksaber, would be created by the Empire and Durga the Hutt, respectively.
Both Death Stars were destroyed by the Rebel Alliance shortly after they became operational. The first Death Star was destroyed by Luke Skywalker, with the help of Han Solo, and the second Death Star was destroyed by Wedge Antilles and Lando Calrissian. Prior to the second Death Star being built, the Galactic Empire tested out a planetary superlaser for protecting its installations on the planet of Dubrillion. At some point after the second's destruction, the Rebel Alliance also attacked and destroyed a third Death Star. Following their destruction, other planet-devastating superweapons followed, including the Galaxy Gun, the Darksaber, the Sun Crusher, and the World Devastators.
Contents[show]
Description
Bail: "Surely there's nothing new about a space fortress."
Tion: "I don't mean a mere orbital gun platform, Your Majesty. This is a machine of war such as the universe has never known. It's colossal, the size of a class-four moon. And it possesses firepower unequaled in the history of warfare."
Leia: "And this, this flying pillbox is going to make you a member of the Imperial elite?"
Tion: "More than a pillbox, Princess. It boasts a Prime Weapon capable of destroying entire planets."
―Bail Organa, Tion and Leia Organa — Gnome-speakernotesListen (file info)[src]
Dsbeamtube5
The first Death Star fires its superlaser.
The Death Stars, the Galactic Empire's ultimate terror weapons, were battle stations several hundred kilometers in diameter and mounting a directed energy superlaser capable of completely destroying a planet with a single shot along with 15000 lasers, ion, turbolasers batteries, and heavy turbolasers in all plus an additional 768 tractor beam emplacements. However, the first Death Star's defenses were not tight enough to stop starfighters from penetrating them.
The first Death Star was 120 kilometers in diameter,[1][2] while the second Death Star was 160 kilometers in diameter.[3] Much of its interior space was devoted to systems required to maintain its massive superlaser and power plant. At the heart of each Death Star was a gigantic hypermatter reactor, which possessed an output equal to that of several main-sequence stars. Within this chamber burned a reaction of prodigious proportions, fed by stellar fuel bottles lining its periphery.
Splitting the station into two equal hemispheres was a huge equatorial trench approximately 503 kilometers in length for the first Death Star and 2,827 kilometers for the second Death Star. This area of the station housed most of the major landing bays, drive thrusters, sensor arrays and tractor beam systems. Halfway between the equator and each pole were two supplementary trenches. The Death Star was divided into 24 zones, 12 per hemisphere, each controlled by a "bridge". To further organize the immense amount of activity aboard, there were specific "sectors" denoting function. These included the General, Command, Military, Security, Service, and Technical sectors.
Death Star Drydock
A drydock on one of the Death Stars
Since service onboard the Death Star was a long-term affair, the station maintained a number of civilian amenities to make the time aboard a deep space station more comfortable. Parks, shopping centers, recreation areas, and taverns such as the Hard Heart Cantina could be found in the general sectors of the station.[4]
Facilitating the Death Star's realspace propulsion were a network of powerful ion engines that transformed reactor power into needed thrust. In order for the Death Star to be a deadly threat, it needed to be mobile. Using linked banks of 123 hyperdrive field generators tied into a single navigational matrix, the Death Star could travel across the Galaxy at superluminal velocities. The incredible energies harnessed by the station combined with its great mass gave the Death Star magnetic and artificial gravitational fields equal to those found on orbital bodies many times greater in size.
The Death Star's superlaser derived power directly from the hypermatter reactor. Its faceted amplification crystal combined the destructive power of eight separate tributary beams into one single blast with the intensity of a stellar core. After firing a blast, though, the Imperial engineers had to recharge the reactor, which took at least 24 standard hours. Though the energy output of this blast could be scaled to fire at smaller targets such as capital ships, as was the case during the Rebel assault on the second Death Star, the two major instances in which the superlaser was fired were at full power at planetary bodies.
The Death Star's interior followed two orientations. Those areas closest to the surface were built with concentric decks with gravity oriented towards the Death Star's core. Past this shell of surface "sprawls", the Death Star's interior had stacked decks with gravity pointing toward the station's southern pole.
History
Design
"Whatever the Empire plans for this battle station, it cannot bode well for the galaxy at large."
―Rahm Kota[src]
The Ultimate Weapon
The plans for the Ultimate Weapon, which would become the Death Star, given to Count Dooku.
The Death Star was born in the mind of Raith Sienar, who had conceived of it as an Expeditionary Battle Planetoid, although he believed the design was impractical. He shared his idea with his friend Wilhuff Tarkin, who presented it to Supreme Chancellor Palpatine, having been impressed enough about the design to champion it in spite of Sienar's doubts about its practicality. Palpatine then turned Sienar's idea to Bevel Lemelisk and ordered him to pursue the needed advances in hypermatter science with the Geonosian hives led by Poggle the Lesser, to which he succeeded in doing so with the Twi'lek scientist Tol Sivron, although the plans ended up falling into enemy hands when the Geonosians joined the Separatists.[5] In actuality, Palpatine, as Sith Lord Darth Sidious, arranged for the designs to be supplied to the Separatists, led by his apprentice, Separatist leader Count Dooku, with Lemelisk being unaware of this. Dooku then had Geonosian Industries accomplish further technical modifications to the original plans.
During the Battle of Geonosis, Archduke Poggle the Lesser, leader of the Geonosians, returned the top-secret designs to Count Dooku to prevent it from falling into the hands of the Jedi. Dooku took the designs back to Coruscant and gave them to Darth Sidious, his dark master.[6] The Separatists then continued to build their superweapon in the Geonosis system.[7]
The 501st Legion was sent to Mygeeto during the Clone Wars to collect an ancient Mygeetan crystal which was an experimental power source that the Chancellor required for a top-secret tributary laser-stream project codenamed "Hammertong," which would be used on the first Death Star.
Darth Sidious later ordered the Death Star's construction after the Galactic Empire was formed, in order to secure his new-formed absolute power. Wilhuff Tarkin was appointed to mastermind the secret development project, though other stories have it that Raith Sienar was the superweapon's creator. Tarkin's creative work and thought resulted in the realization of the Death Star as the Empire's ultimate weapon.
After the beginning of the Great Jedi Purge, an assault was led on the planet Kashyyyk to enslave the native Wookiees for the Death Star's construction. Various prison planets were also known to have their captives unwittingly construct various sections of the station. The Empire also had Mrlssi scientists working on some of the technology that would go into the station.[8]
Moff Tarkin
Wilhuff Tarkin with Emperor Palpatine and Darth Vader in 19 BBY overlooking the construction of the first Death Star.
Nevertheless, the project nearly ended before it began. Because much of the technology of the Death Star was impressive, actually building it proved to be more difficult than anyone imagined. Efforts were not helped by repeated (and often unsuccessful) attempts to sabotage construction. In addition, spies belonging to Gentis were also planted on the development team in charge of the Death Star since a few weeks after the creation of a New Order, which factored into his military coup against Palpatine a few months afterwards.
Implementation
"The cost of maintaining order is high - some would say too high - but to preserve peace and stability, difficult choices must be made. Yes, the destruction of Alderaan was regrettable, but so was the destruction of the Death Stars. Are the death of millions of Alderaanians - who conspired to overthrow the government - more tragic than the deaths of the millions of Imperial soldiers who laid down their lives to defend our way of life? I think not."
―Imperial High Inquisitor Antinnis Tremayne[src]
Of particular concern was the technology required to create the massive superlaser, the heart of the weapon, which was derived from the long-running Hammertong Project. The Superlaser cannon was initially going to be placed in the equator, but for reasons unspecified was later moved to the dorsal hemisphere. In addition, the tributary lasers required fine-tuning and perfect alignment during development, otherwise it would result in the central beam misfocusing and dissipate in a flurry of backscatter that ended up being far more dangerous to the superlaser housing than to any target. As the superlaser at that time required a significant amount of power generation to maintain, and it was powered primarily by the station's hypermatter reactor, it also had to disable all other functions of the ship, including shields and life support, were knocked offline when it was in use. Lastly, the firing process also generated magnetic flux and gravitational flux, which also needed to be dissipated in fear of either misaligning the crystals or, in the worst case scenario, tear the station apart.[5] To this end, Tarkin brought together some of the most brilliant minds of the Galaxy, including Tol Sivron, Qwi Xux, and Bevel Lemelisk, and built a proof-of-concept model at the Maw Installation. This model would eventually become known as the Death Star prototype. These scientists also found and corrected several flaws in the Geonosian blueprints, which had been used in that phase of construction. Renowned physicist Rorax Falken worked with the Empire at some point during the construction of the Death Star, though he was not aware that his ideas and knowledge were being used for a battlestation.[8] During this time, the Death Star construction also frequently relocated, from Geonosis to Seswenna to Patriim to Horuz, the latter location being the location when the battle station was starting to become a reality.[5]
With the concept completed and the plans finalized, Lemelisk took the plans to Despayre, where construction would finally be completed after twenty years of hard work and the death of many individuals. In celebration, the Death Star turned its massive weapon on Despayre itself, completely destroying it.[9] After the completion of the first Death Star, codenamed the DS-1 Orbital Battle Station, Lemelisk and the IDMR have explored two potential concepts for the Death Star's future: Either having various factory worlds switch their output to the production of assembly-line duplicates of the current DS-1 model, or have the Empire build an even larger and more dangerous Death Star reaching 160 km in diameter.[10] The Empire would ultimately opt with the latter concept.
During its construction, the Death Star was home to countless prisoners of the Empire, from political opponents to pirate gangs to Rebel saboteurs. These prisoners managed to break out and riot in the Death Star, but were put down by the 501st Legion. However, some managed to escape with a partial set of the plans and some Imperial data.[11]
DestructionOfAlderaan-ANH
The first Death Star's superlaser hits Alderaan.
Galen Marek traveled to the Death Star to free Bail Prestor Organa, Rahm Kota, and rest of the founders of the Rebel Alliance including Mon Mothma. He fought Darth Vader in the corridor leading to Sidious' Observation Chamber. He severely injured the Sith Lord and Palpatine urged Galen to kill Vader. Galen instead attacked Sidious himself. The pair dueled viciously with the force and lightsaber combat. Galen sacrificed his life in an explosion which allowed the Rebels to escape. He was honored by the Alliance when his family crest was used as their symbol.
Just after construction was completed, the other set of Death Star plans was discovered by Rebel spies on a secret signal interceptions asteroid outpost, AX-235; the Rebellion moved on and in the borders of Operation Skyhook, a copy of the plans was stolen by Kyle Katarn from Danuta and finally reached Leia Organa. Later, while attempting to recruit Obi-Wan Kenobi to the rebel cause, Leia's vessel,Tantive IV was attacked by the Star Destroyer Devastator above Tatooine. Leia, before being captured, transmitted the plans in R2-D2 and sent them to Obi-Wan Kenobi on Tatooine. Upon arriving at Alderaan, which had been destroyed by the Death Star, Han Solo, Luke Skywalker, Kenobi, and Chewbacca mistook the station for a small moon while following a lone TIE/LN starfighter.
The quartet was soon captured, but after escaping from the Death Star with Leia, the plans to the station were transported by Princess Leia with their help to Rebel leaders on Yavin IV. Soon after, the Death Star arrived to destroy the rebel base, having located it via a transmitter placed on the Millennium Falcon. After softening the defenses by destroying some of the Deflection Towers,[12] Luke Skywalker piloted a T-65 X-wing starfighter through a minor trench on the surface of the Death Star, then Vader followed him in, and during his evasion of Darth Vader, he heard Obi-Wan call to him, telling him to use the Force, not his targeting computer. Luke switched off his computer, to the concern of the Rebels in the base, then fired two proton torpedoes into the "reactor core". This caused a chain reaction that destroyed the battle station just before it could fire on the Rebel base.[13] Ironically, shortly before Luke's destruction of the Death Star, Palpatine had ordered for the creation of a second Death Star.[5]
DeathStarII-BotF
The incomplete Death Star II.
Nearly four years later, Bothan spies stole the plans of the second Death Star, unaware that their theft was orchestrated by Emperor Palpatine, having agreed to a suggestion personally made to him by Black Sun leader Prince Xizor. General Crix Madine and Admiral Gial Ackbar devised a plan for the destruction of the new Death Star. Han Solo led a team to the forest moon of Endor to destroy the shield generator there. The plan called for a group of fighters and the Millennium Falcon piloted by Lando Calrissian to attack the Death Star upon destruction of the shield generator. The fighters flew into the center of the station through a narrow maze of pipes to destroy the reactor directly and rushed out in just enough time to escape the ensuing explosion before the station could carry out its final order: destroying the Sanctuary Moon of Endor. A few moments prior to its destruction, an evacuation order for all non-essential personnel was also called.[14]
At some point after the Battle of Endor, a third Death Star was being constructed in orbit around the forest moon of Endor which was escorted by a fleet of Imperial-class Star Destroyers but was destroyed by the New Republic while still undergoing construction. Its weakness was a hole similar to the thermal exhaust port of the first Death Star.
Years later, when Han Solo first encountered the Yuuzhan Vong and their colossal worldships, he would comment: "Why isn't there a Death Star lying around when you need one?"
Additional information
Around the same time the Geonosians were designing their Ultimate Weapon, Raith Sienar was designing a battlestation (apparently without a superlaser) of similar size and prestige. The best elements of both were apparently merged together with final detail work taking place in the secret Maw Cluster near Kessel. This laboratory completed a scaled-down prototype that was later destroyed by the New Republic.
Additional Defenses
DSTurbolasers
Two of thousands of turbolasers on the first Death Star
Both Death Stars were defended by hundreds of shield projectors (including Deflection towers), and thousands of turbolasers, ion cannons and laser cannons. The first one contained a complement of seven to nine thousand TIE fighters, along with tens of thousands of support craft, bombers, and gunships. Massive docking bays provided several Star Destroyers with dry docks, and more than a million Imperial personnel were on board both battle stations.
Design flaws
One drawback of the original design was the power systems. Twenty-four hours were required to fully charge the laser. However, even low power shots were capable of massive destruction on a planetary scale. The second Death Star had redesigned systems and was capable of firing the superlaser once every three minutes. It also had improved targeting computers, allowing it to fire the weapon accurately at capital ships.
There were small gaps in the shields of the first Death Star; the Empire believed that this was harmless since only small ships could wiggle through the gaps. The shields of the second Death Star would have had no such gaps.
The second Death Star also corrected several other flaws in the original design. The two-meter exhaust vent that doomed the first station was replaced with millions of millimeter wide tubes, each designed to seal if excess energy was detected. The second station also boasted far more turbolaser batteries with redesigned targeting systems, allowing them to target starfighters more easily. The greatest concentration of turbolasers was located near the Emperor's throne tower.
Darksaber
Durga the Hutt also built a small version with only the central laser core and a small living quarters, which was destroyed in the asteroid field around Hoth. This was known as the Darksaber, but shoddy construction techniques and substandard components meant that this attempt was an abject failure even before its destruction.
Behind the scenes
According to the Star Wars: Incredible Cross-Sections fact book, the first Death Star in A New Hope was 160 kilometers in diameter. The Making of Star Wars: The Definitive Story Behind the Original Film reproduces a sketch attributed to Ralph McQuarrie which shows 92 miles (148 kilometers). According to the Inside the Worlds of Star Wars Trilogy fact book and detailed scaling of the station in Return of the Jedi, the second Death Star was 900 kilometers in diameter. Some Expanded Universe sources state much smaller figures—120 kilometers for the first Death Star and 160 kilometers for the second—however, most of the evidence argues for the larger sizes.
The Dalek Crucible in Doctor Who from series 4 in 2008 is said to be inspired by the Death Star, apart from the 'wings' on the side, the Crucible is very similar, but the eye is covered by a shield whereas on the Death Star it is not.
Several of the Star Wars games are concerned with the Death Star's destruction, or the theft, protection, and transmission of its plans until reaching Tantive IV. Some games also focus on the immediate aftermath, such as Rogue Squadron III: Rebel Strike.
The Death Star is available as a cheat in Star Wars: Galactic Battlegrounds: Clone Campaigns. It acts like an air cruiser unit, but is much slower. It more than makes up for its speed with excessive hit points, shielding, armor, and the most powerful attack in the game—any object on the map, even trees and rocks disappear after the Death Star fires. It is virtually impossible to destroy it. There is a limit on the number of Death Stars the player can conjure up at any time.
A number of Death Star battle stations appear in sources of uncertain canonicity. The Star Tours theme-park ride includes another battlemoon at Endor, clearly different than the one seen in Return of the Jedi, while the French-language RPG Magazine Casus Belli 99 includes another prototype, named the Nocturnô. The former, however, was officially entered into continuity by Leland Chee, the gatekeeper of the LucasFilm Holocron Continuity Database, with it being named the Death Star III.
The Death Star has also influenced popular culture, a tribute to the Death Star, the "Death Egg" making an appearance in the Sonic the Hedgehog series (1992).
Besides its role in Star Wars: Rogue Squadron III: Rebel Strike, both in the main campaign and its appearance in the co-op mode for the game (based on Rogue Squadron II: Rogue Leader), the Death Star also had an appearance in the game's opening and arcade mode, as a disco ball.
In the eleventh issue of Star Wars Adventure Journal, under the Fragments from the Mind's Eye section, the Death star was sold as a discount superweapon at B'hob's Discount Superweapons. Its tagline, "Only Exploded Twice", was a humorous reference to how both the original Death Star and the Death Star II were destroyed.
Mimas
Mimas
That's no space station; it's a moon.
Mimas, the smallest and innermost of seven major moons orbiting the planet Saturn, is notable for a single enormous impact crater called Herschel. The appearance of Mimas and Herschel in pictures taken during the space probe Voyager 1's 1980 flyby of the Saturn system showed a similarity to the first Death Star, with Herschel appearing as the superlaser disc, as remarked upon in the scientific press.[15] This resemblance became one of Mimas's most notable characteristics in astronomy and popular culture.[16]
During the Cassini orbiter's visit to the Saturn system in 2004, the resemblance was noted again in the official press releases[17] and by the scientific press.[18] However, Cassini's more recent images of Mimas do not all resemble a Death Star orbiting Saturn, as the moon is more egg-shaped than the battlestation.[19]
White House petition
In late 2012, a petition was submitted to the White House website urging that the United States government build a real Death Star as an economic stimulus and a means to ensure people got back to work again, and wanted its completion by 2016 at the earliest. The petition gained more than 25,000 signatures, ensuring that an official response be supplied. In early 2013, the proposal was rejected (in a tongue-and-cheek manner), citing that the overall cost of the Death Star's construction would amount to a cost exceeding $852 quadrillion, and would take 833,000 years before it could even be ready for construction due to the rate of steel production. Another reason for the rejection was also because the Government "did not support blowing up planets."[20] As such, the Star Wars Blog, in response to it, created a light-hearted, in-universe reply from the Galactic Empire's Public Relations department where the Empire, with official statements from Admiral Conan Antonio Motti and Governor Wilhuff Tarkin, shrugged off the criticisms by the planet Earth's leaders regarding the design of the battlestation. In addition, in the same source, it also denounced the planet for grossly overestimating the cost of designing the Death Star, as well as commenting the overall lack of production methods of the planet in comparison of the Galactic Empire, even implying that the planet's leaders were cowardly in their decision.[21]
Translations
In Italian the Death Stars are called Morte Nera, in Italian "morte nera" is synonymous with "bubonic plague".
In the Angry Birds franchise, the Death Stars are called Death Eggs.
In some comics the Death Star is called Justice Star.
Appearances
Jedi Apprentice: The Fight for Truth (Indirect mention only)
Rogue Planet (Mentioned only)
Star Wars: Episode II Attack of the Clones (Ultimate Weapon plans)
The Clone Wars: The Starcrusher Trap (Appears in hologram)
MedStar II: Jedi Healer
CWACite "Run Mace Run"—Star Wars: Clone Wars Adventures Volume 2 (Indirect mention only)
Star Wars: Episode III Revenge of the Sith (Death Star I)
Star Wars Episode III: Revenge of the Sith (video game) (Death Star I)
Darth Vader and the Lost Command 4 (Appears in hologram)
Star Tours: The Adventures Continue (Death Star I)
Star Wars: The Force Unleashed
Rebel Dawn (Indirect mention only)
Death Star
Star Wars: Lethal Alliance (Death Star I)
Dark Forces: Soldier for the Empire / audio (Mentioned only)
Star Wars: Episode IV A New Hope (Death Star I)
Star Wars Episode IV: A New Hope novel (First appearance) (Death Star I)
Escape from the Death Star
Star Wars Battlefront: Elite Squadron
The Star Wars Holiday Special (Death Star I) (Stock footage from A New Hope)
Scoundrel's Luck
Jedi's Honor
Strike Force: Shantipole (Mentioned only)
Scavenger Hunt (Mentioned only)
Crisis on Cloud City (Mentioned only)
Black Ice (Mentioned only)
Graveyard of Alderaan (Mentioned only)
WEG icon2 "Graveyard of Alderaan"—Classic Adventures: Volume Two (Mentioned only) (Reprint)
SWAJsmall "Swoop Gangs"—Star Wars Adventure Journal 6 (Mentioned only)
Star Wars: Galactic Battlegrounds: Clone Campaigns (As a cheat)
Star Wars Galaxies
Star Wars: Battlefront
Star Wars: Battlefront II (Death Stars I and II)
Star Wars: Dark Forces (Appears in hologram)
Star Wars: Empire at War (Death Star I)
Star Wars: Rebellion: My Brother, My Enemy (Death Star I) (Appears in flashback(s))
Classic Star Wars 1 (Mentioned only)
Classic Star Wars 2 (Mentioned only)
FFG "Phantoms in the Dark"—Strongholds of Resistance (Mentioned only)
Star Wars: Episode V The Empire Strikes Back (Mentioned only)
Star Wars: Empire at War: Forces of Corruption (Remains of Death Star I; Death Star II)
Star Tours (Death Star III)
Star Wars: Episode VI Return of the Jedi (Death Star II)
WEG icon2 "Den of Spies"—Twin Stars of Kira
WEG icon2 "For a Few Kilotons More"—Twin Stars of Kira
WEG icon2 "Freedom Strike Seltos"—Twin Stars of Kira (Mentioned only)
Shadows of the Empire: Evolution (Mentioned only)
SWAJsmall "Missed Chance"—Star Wars Adventure Journal 7 (Mentioned only)
X-Wing: Isard's Revenge (Mentioned only)
X-Wing: Starfighters of Adumar (Mentioned only)
Jedi Search (Death Star prototype)
Champions of the Force (Death Star prototype)
Star Wars: Rogue Squadron II: Rogue Leader (Death Stars I and II)
Star Wars: Rogue Squadron III: Rebel Strike (Death Stars I and II)
The New Jedi Order: Edge of Victory II: Rebirth (Mentioned only)
Legacy of the Force: Betrayal (Mentioned only)
Legacy of the Force: Revelation (Mentioned only)
Fate of the Jedi: Outcast (Mentioned only)
Fate of the Jedi: Conviction (Mentioned only)
X-Wing: Mercy Kill (Mentioned only)
Legacy 50: Extremes, Part 3 (Mentioned only)
Non-canon appearances
Star Wars: Jedi Knight II: Jedi Outcast (Appears only in non-storyline event)
Soulcalibur IV
Star Wars: Rebellion
LEGO Star Wars II: The Original Trilogy (Death Stars I and II)
LEGO Star Wars: The Complete Saga (Death Stars I and II)
Angry Birds Star Wars (Pig version)
Sources
Star Wars toy line
Star Wars Word Puzzles
A Guide to the Star Wars Universe
Star Wars: The Roleplaying Game
Star Warriors: Starfighter Combat in the Star Wars Universe
The Star Wars Sourcebook
Galaxy Guide 1: A New Hope
The Star Wars Rules Companion
Galaxy Guide 2: Yavin and Bespin
Battle for Endor
Galaxy Guide 3: The Empire Strikes Back
Imperial Sourcebook
Galaxy Guide 5: Return of the Jedi
Galaxy Guide 6: Tramp Freighters
The Rebel Alliance Sourcebook
Death Star Technical Companion
Cracken's Rebel Field Guide
Star Wars Miniatures Battles
Heir to the Empire Sourcebook
Star Wars: The Roleplaying Game, Second Edition
Dark Force Rising Sourcebook
Star Wars Gamemaster Screen
Wanted by Cracken
Galaxy Guide 7: Mos Eisley
Galaxy Guide 8: Scouts
Star Wars Gamemaster Handbook
Galaxy Guide 9: Fragments from the Rim
Dark Empire Sourcebook
Star Wars Technical Journal of the Planet Tatooine
Super Empire Strikes Back Official Game Secrets
The Movie Trilogy Sourcebook
Death Star Technical Companion, Second Edition
Han Solo and the Corporate Sector Sourcebook
Star Wars Miniatures Battles, Second Edition
The Last Command Sourcebook
The Rebel Alliance Sourcebook, Second Edition
Galaxy Guide 6: Tramp Freighters, Second Edition
SWAJsmall "The Free-Trader's Guide to Sevarcos"—Star Wars Adventure Journal 2
Star Wars Sourcebook, Second Edition
Imperial Sourcebook, Second Edition
Star Wars Miniatures Battles Companion
SWAJsmall "The Pentastar Alignment"—Star Wars Adventure Journal 3
SWAJsmall "Blasters for Hire"—Star Wars Adventure Journal 3
Galaxy Guide 11: Criminal Organizations
Star Wars Technical Journal
Galladinium's Fantastic Technology
Flashpoint! Brak Sector
Alliance Intelligence Reports
SWAJsmall "The History of R-Series Astromech Droids"—Star Wars Adventure Journal 7
SWAJsmall "Into the Core Worlds"—Star Wars Adventure Journal 7
Galaxy Guide 12: Aliens — Enemies and Allies
Galaxy Guide 1: A New Hope, Second Edition
Galaxy Guide 5: Return of the Jedi, Second Edition
WEG icon2 "The Pentastar Alignment"—Classic Adventures: Volume Four - The Best of the Journal
Star Wars: The Power of the Force (1995)
The Essential Guide to Vehicles and Vessels
SWAJsmall "Cracken's Rebel Operatives"—Star Wars Adventure Journal 10
SWAJsmall "Wanted by Cracken"—Star Wars Adventure Journal 10
Shadows of the Empire Sourcebook
SotE TC Star Wars: Shadows of the Empire trading cards (Card: Xizor is Lurking) (backup link)
SotE TC Star Wars: Shadows of the Empire trading cards (Card: Leia and Chewie Go Underground)
Kenner-logo Star Wars: Shadows of the Empire (Pack: Darth Vader vs. Prince Xizor) (backup link)
Galoob Star Wars: Shadows of the Empire Micro Machines (Pack: Collection III)
Star Wars: The Art of the Brothers Hildebrandt
SWInsider "Straight from the Horse's Mouth"—Star Wars Insider 35
Topps logo Star Wars Vehicles (Card: Death Star)
Star Wars: Rebellion: Prima's Official Strategy Guide
The New Essential Guide to Weapons and Technology
Death Star Designer
SWCCGsmall Star Wars Customizable Card Game – Premiere Limited (Card: Death Star Central Core)
SWCCGsmall Star Wars Customizable Card Game – Premiere Limited (Card: Death Star War Room)
SWCCGsmall Star Wars Customizable Card Game – Premiere Limited (Card: Death Star Level Four Military Corridor)
SWCCGsmall Star Wars Customizable Card Game – Premiere Limited (Card: Death Star Docking Bay 327)
SWCCGsmall Star Wars Customizable Card Game – Premiere Limited (Card: Death Star Detention Block)
Star Wars: The Action Figure Archive
Star Wars: Power of the Jedi
The Dark Side Sourcebook
WizardsoftheCoast "Furry and Fury" on Wizards.com (original article link, backup link)
WizardsoftheCoast "Universe Preview 8" on Wizards.com (original article link, backup link)
WizardsoftheCoast "Alliance and Empire Preview 4" on Wizards.com (original article link, backup link)
Star Wars: The Official Figurine Collection 53 (High-Speed Travel: Hyperspace Routes)
HyperspaceIcon "Castaways of Endor" on Hyperspace (article) (content removed from StarWars.com and unavailable)
Star Wars Fandex Deluxe Edition
The Complete Star Wars Encyclopedia
SWGTCGsmall Star Wars Galaxies Trading Card Game – Champions of the Force (Card: Death Star Hologram)
SWGTCGsmall Star Wars Galaxies Trading Card Game – The Shadow Syndicate (Card: Tarkin Doctrine)
HyperspaceIcon "Tinker, Tailor, Soldier, Praji" on Hyperspace (article) (content removed from StarWars.com and unavailable)
Star Wars: Empire at War: Prima Official Game Guide
SWInsider "Han Solo: The Early Years"—Star Wars Insider 106
SWGTCGsmall Star Wars Galaxies Trading Card Game – The Shadow Syndicate (Card: Death Star Construction Hologram)
HyperspaceIcon "The Written Word" on Hyperspace (article) (content removed from StarWars.com and unavailable)
The Unknown Regions
SWicon The Clone Wars Episode Guide: The Citadel on StarWars.com (content now obsolete; backup link)
SWInsider "50 Great Reasons to Rewatch Star Wars: The Clone Wars Season Three"—Star Wars Insider 125
Databank title Death Star in the Databank (content now obsolete; backup link)
Databank title Death Star II in the Databank (content now obsolete; backup link)
Databank title Janus Greejatus in the Databank (content now obsolete; backup link)
Book of Sith: Secrets from the Dark Side
Star Wars: Beware the Sith
The Essential Guide to Warfare
Star Wars: The Ultimate Visual Guide: Updated and Expanded
The Essential Reader's Companion
FFGXWMG Star Wars: X-Wing Miniatures Game – Core Set (Card: Biggs Darklighter—X-wing) (Picture only)
FFGXWMG Star Wars: X-Wing Miniatures Game – Core Set (Card: Black Squadron Pilot—TIE Fighter) (Picture only)
FFGXWMG Star Wars: X-Wing Miniatures Game – Core Set (Card: Determination) (Picture only)
FFGXWMG Star Wars: X-Wing Miniatures Game – Core Set (Card: "Mauler Mithel"—TIE Fighter) (Picture only)
FFGXWMG Star Wars: X-Wing Miniatures Game – Core Set (Card: Proton Torpedoes) (Picture only)
FFGXWMG Star Wars: X-Wing Miniatures Game – X-Wing Expansion Pack (Card: Proton Torpedoes) (Picture only)
FFGXWMG Star Wars: X-Wing Miniatures Game – TIE Fighter Expansion Pack (Card: "Backstabber"—TIE Fighter) (Picture only)
FFGXWMG Star Wars: X-Wing Miniatures Game – TIE Fighter Expansion Pack (Card: Black Squadron Pilot—TIE Fighter) (Picture only)
FFGXWMG Star Wars: X-Wing Miniatures Game – TIE Fighter Expansion Pack (Card: Determination) (Picture only)
FFGXWMG Star Wars: X-Wing Miniatures Game – Y-Wing Expansion Pack (Card: "Dutch" Vander—Y-wing) (Picture only)
FFGXWMG Star Wars: X-Wing Miniatures Game – Y-Wing Expansion Pack (Card: Proton Torpedoes) (Picture only)
FFGXWMG Star Wars: X-Wing Miniatures Game – TIE Advanced Expansion Pack (Card: Tempest Squadron Pilot—TIE Advanced) (Picture only)
Death Star Owner's Technical Manual
SWInsider "Red Five"—Star Wars Insider 137
StarWarsLCG Logo Star Wars: The Card Game – Core Set (Card: Red Five) (Picture only)
StarWarsLCG Logo Star Wars: The Card Game – Core Set (Card: Red Two) (Picture only)
StarWarsLCG Logo Star Wars: The Card Game – Core Set (Card: Rebel Assault) (Picture only)
StarWarsLCG Logo Star Wars: The Card Game – Core Set (Card: X-Wing Escort) (Picture only)
StarWarsLCG Logo Star Wars: The Card Game – Core Set (Card: Trench Run) (Picture only)
StarWarsLCG Logo Star Wars: The Card Game – Core Set (Card: TIE Advanced) (Picture only)
StarWarsLCG Logo Star Wars: The Card Game – Core Set (Card: The Emperor's Web) (Picture only)
StarWarsLCG Logo Star Wars: The Card Game – Core Set (Card: Imperial Command) (Picture only)
StarWarsLCG Logo Star Wars: The Card Game – Core Set (Card: Admiral Motti) (Indirect mention only)
StarWarsLCG Logo Star Wars: The Card Game – Core Set (Card: Heavy Stormtrooper Squad)
StarWarsLCG Logo Star Wars: The Card Game – Core Set (Card: The Ultimate Power) (Picture only)
StarWarsLCG Logo Star Wars: The Card Game – Core Set (Card: Death and Despayre)
StarWarsLCG Logo Star Wars: The Card Game – Core Set (Card: Imperial Officer) (Picture only)
StarWarsLCG Logo Star Wars: The Card Game – Core Set (Card: Defense Upgrade) (Indirect mention only)
StarWarsLCG Logo Star Wars: The Card Game – Core Set (Card: Defense Protocol)
StarWarsLCG Logo Star Wars: The Card Game – Core Set (Card: Take Them Prisoner)
StarWarsLCG Logo Star Wars: The Card Game – Core Set (Card: Death Star Trooper)
FFGXWMG Star Wars: X-Wing Miniatures Game – A-Wing Expansion Pack (Card: Arvel Crynyd—A-wing) (Picture only)
FFGXWMG Star Wars: X-Wing Miniatures Game – TIE Interceptor Expansion Pack (Card: Alpha Squadron Pilot—TIE Interceptor) (Picture only)
Star Wars: Edge of the Empire Core Rulebook
StarWarsLCG Logo Star Wars: The Card Game – Edge of Darkness (Card: Alderaanian Artist) (Picture only)
Star Wars: Force Collection (Card: Admiral Motti)
Star Wars: Force Collection (Card: General Tagge)
Star Wars: Force Collection (Card: Grand Moff Tarkin (★★))
Star Wars: Force Collection (Card: Han Solo (★★★))
Star Wars: Force Collection (Card: Leia Organa (★★★, Death Star)) (Picture only)
Star Wars: Force Collection (Card: Luke Skywalker (★★★, Death Star))
Star Wars: Force Collection (Card: Poggle the Lesser (★★★)) (Picture only) (Appears in hologram)
Star Wars: Force Collection (Card: Stormtrooper (★★★, Death Star))
Star Wars: Force Collection (Card: Ben Kenobi (★★★★)) (Picture only)
Star Wars: Force Collection (Card: Ben Kenobi (★★★★, Event card)) (Picture only)
Star Wars: Force Collection (Card: Darth Vader (★★★★)) (Picture only)
Star Wars: Force Collection (Card: Grand Moff Tarkin (★★★★))
Star Wars: Force Collection (Card: Lando Calrissian)
Star Wars: Force Collection (Card: Darth Vader (★★★★★)) (Picture only)
Star Wars: Force Collection (Card: Han Solo (★★★★★))
Star Wars: Force Collection (Card: Luke Skywalker (Special))
Star Wars: Force Collection (Card: Han Solo (Special))
Star Wars Blog "Planet Earth Abandons Death Star Project In Face Of Superior Galactic Imperial Power," The Official Star Wars Blog
FFGXWMG Star Wars: X-Wing Miniatures Game – B-Wing Expansion Pack (Card: Proton Torpedoes) (Picture only)
StarWarsLCG Logo Star Wars: The Card Game – Balance of the Force (Card: Blue Leader) (Picture only)
StarWarsLCG Logo Star Wars: The Card Game – Balance of the Force (Card: Mission at Kothlis)
StarWarsLCG Logo Star Wars: The Card Game – Balance of the Force (Card: Death Star II)
StarWarsLCG Logo Star Wars: The Card Game – Balance of the Force (Card: Lemelisk's Ambition)
StarWarsLCG Logo Star Wars: The Card Game – Balance of the Force (Card: Along the Sanctuary Pipeline)
StarWarsLCG Logo Star Wars: The Card Game – Balance of the Force (Card: Heightened Security) (Picture only)
StarWarsLCG Logo Star Wars: The Card Game – Balance of the Force (Card: Death Star Guards)
StarWarsLCG Logo Star Wars: The Card Game – Balance of the Force (Card: TIE Interceptor) (Picture only)
StarWarsLCG Logo Star Wars: The Card Game – Balance of the Force (Card: Admiral Piett) (Picture only)
StarWarsLCG Logo Star Wars: The Card Game – Balance of the Force (Card: We Shall Double Our Efforts) (Picture only)
StarWarsLCG Logo Star Wars: The Card Game – Balance of the Force (Card: Fully Armed) (Picture only)
StarWarsLCG Logo Star Wars: The Card Game – Balance of the Force (Card: Red Five) (Picture only)
SWCustom-2011 The Imperial Warlords: Despoilers of an Empire, Part 2 on StarWars.com (article) (backup link)
Dangerous Covenants
FFGXWMG Star Wars: X-Wing Miniatures Game – Imperial Aces Expansion Pack (Card: Targeting Computer) (Picture only)
StarWarsLCG Logo Star Wars: The Card Game – Heroes and Legends (Card: General Mohc)
Encyclopedia-Logo Alderaan cruiser in the Encyclopedia (link now obsolete; backup link)
Encyclopedia-Logo Death Star in the Encyclopedia (link now obsolete; backup link)
Encyclopedia-Logo Galactic Empire in the Encyclopedia (link now obsolete; backup link)
Encyclopedia-Logo Rebel Pilots in the Encyclopedia (link now obsolete; backup link)
Encyclopedia-Logo X-wing fighter in the Encyclopedia (link now obsolete; backup link)
Star Wars: Age of Rebellion Core Rulebook
StarWarsLCG Logo Star Wars: The Card Game – Between the Shadows (Card: General Tagge)
StarWarsLCG Logo Star Wars: The Card Game – Between the Shadows (Card: Security Task Force)
SWCustom-2011 SWCA: The Untold Clone Wars Panel Liveblog on StarWars.com
Strongholds of Resistance
See also
Wiki-shrinkable
Wookieepedia has 20 images related to Death Star.
Death Star locations
Death Star plans
Death Star prototype
Expeditionary Battle Planetoid
659
« on: June 07, 2019, 10:21:29 AM »
OT Star Wars = Older Star Trek > Newer Star Trek > Prequel Star Wars > dog shit > ST Star Wars
why do you hate new star wars? it's definitely not quite up to par with the original saga, but i wouldn't call it worse than dog shit.
Cause Luke is an actual human being and not the same Shounen Anime protagonist he was in Legends.
660
« on: June 07, 2019, 12:03:18 AM »
*Watches a minecraft video ONCE* Youtube Recommendations: 
Pages: 1 ... 202122 2324 ... 28
|
